Custom Radio Button
Simple radio button can be created by giving input type as "radio"

Hence a group of radio buttons are created,

What if you wanted to create some colorful radio buttons apart from the typical ones!!
First step is to create a radio button inside a label, so that the name for radio button can be given in label. A label followed by an input with the type as "radio" and then followed by a span in which image for the radio button can be given.

Input's id must be given as "for" in label, to map the particular radio input to the respective label. "Name" must be given the same for all radio buttons inside a radio group, in this case, name is given as "smiley".
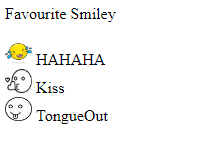
In this example I have created three radio inputs which asks for your favorite smiley.

The above code gives the following output,

Now we have to style the radio button in order to replace the boring radio button with our colorful images.
First and foremost we have to make the boring radio button invisible,

The output of above code is,

Next step is to position the images in place of the typical radio button.
for the span below input tag, give the images as background and style the span tag with width, height as below,

After giving the images as background for span, we get the following output,

Pretty cool right? Come on lets make more cool :P
It will be awesome if we make the smiley change images when clicked isn't it? So that we would know which option we chose.
To achieve that, we have to give styles for the span when the corresponding radio button is clicked. This can be implemented using "checked" attribute of the input tag.

In the above code, when an input tag of type "radio" is checked(clicked) , it's sibling span element's background image will change accordingly. For the sibling selection purpose, we have used '~' selector.
Hence upon clicking a particular option, image will change correspondingly,


You can check working code in jsFiddle
Thank you!!
Comments
Post a Comment